- Adding photos to articles
- Adjusting article names and sales units
- Automatically overwriting article names
- Charging trolleys
- Creating and organizing article groups
- Creating and using bouquets
- Creating and using label groups
- Creating sales barcodes
- Importing FloraHolland container price list
- Using your own VBN codes
Creating and using label groups
Using label groups
Introduction: What are label groups?
Label groups are collections of article groups that you can bundle under one code. For example: instead of treating "roses", "tulips" and "lilies" separately, you can put them all in label group "Flowers A". This code can then be printed on labels so employees know where products should go.
Why use label groups?
Label groups are used for two important things:
1. Distributing responsibility among employees
- You can assign certain product groups to specific employees
- For example: Jan is responsible for all cut flowers, Marie for all plants
- Employees then only see "their" products and don't need to worry about the rest
2. Better organize the warehouse
- You can subdivide your storage location with codes
- For example: Label group "A" is on the left in the warehouse, label group "B" on the right
- This code is on the labels, so employees immediately know where products should go
- This makes work faster and clearer
How do you create label groups?
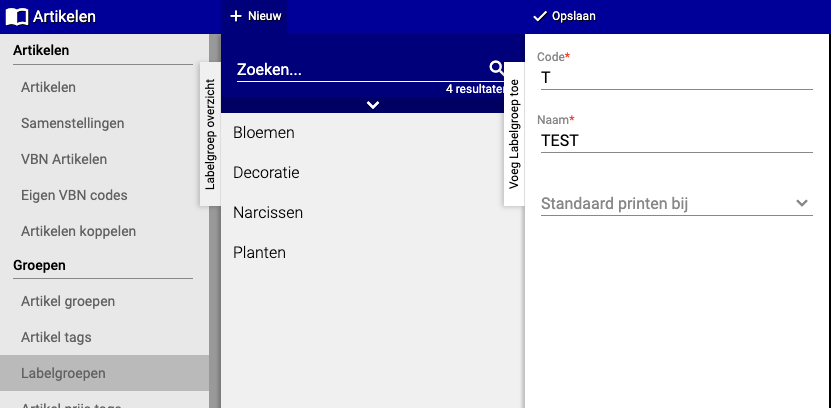
Step 1: Create a label group
Go to the label groups menu
- Go to "Articles"
- Click on "(Groups) Label groups"
- Click on "+New"
Fill in the label group
- Fill in the following information:
- Code: A short code that is printed on labels (e.g., "FLW-A" for flowers zone A)
- Name: A clear name for internal use (e.g., "Cut flowers zone A")
Note: The code must be clear for logistics staff. When they see "FLW-A" on a label, they should immediately know where it should go.
Extra option: Default print at You can also set when this label group may be printed on labels:
- Check-in: The code appears on labels when checking in products
- Logistics distribution: The code appears on shipping labels
- Both: Leave this field empty, then the code is used for both
- Click "Save"
Step 2: Link article groups to the label group
Now we'll determine which product groups fall under this label group.
Go to article groups
- Go to "Articles"
- Click on "(Groups) Article groups"
- Search and select the article group you want to link to a label group (e.g., "Roses")
- Click "Label group"
Choose the label group
- Choose the label group you created in step 1 (e.g., "FLW-A")
- Click "Save"
- Repeat this for all article groups that belong to this label group
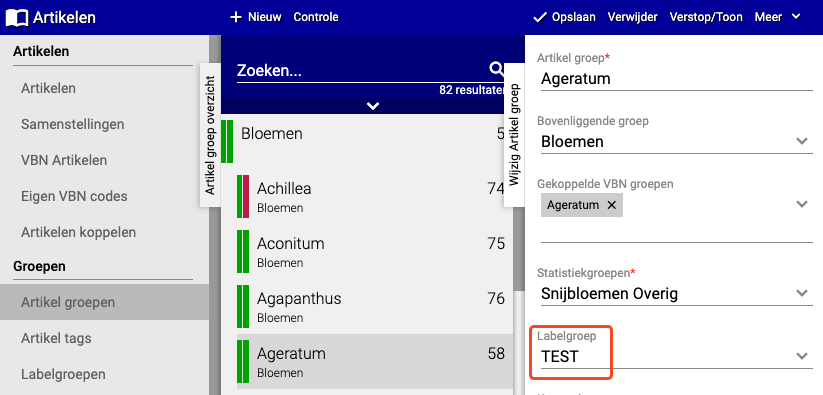
Tip: You can use the same label group for multiple article groups. For example: "Roses", "Tulips" and "Lilies" can all be in label group "FLW-A".
Step 3: Assign responsibility to employees (optional)
Want certain employees to only see and edit certain product groups? Then you can set this here.
Go to employee settings
- Go to "Organization"
- Click on "(General) Employees"
- Search and select the employee (e.g., "Jan")
- Click on "(Purchase) Article groups"
- Click on "+New"
Assign article groups
- Choose the article group this employee is responsible for (e.g., "Roses")
- Click "Save"
- Repeat this for all article groups this employee should work on

What happens now?
- Jan now only sees the product groups assigned to him
- He doesn't need to deal with products that are not his responsibility
- This makes work clearer and prevents mistakes
Practical examples
Example 1: Organizing warehouse
- Label group "ZONE-A" = Left side warehouse (Roses, Tulips)
- Label group "ZONE-B" = Right side warehouse (Plants, Houseplants)
- Labels show "ZONE-A" or "ZONE-B", employees immediately know where to go
Example 2: Distributing responsibilities
- Jan gets access to article groups: Roses, Tulips, Lilies (all in label group "Cut flowers")
- Marie gets access to article groups: Plants, Houseplants (all in label group "Green")
- Everyone works only on their own products
Summary
Label groups help you to:
- Bundle article groups under one code
- Better organize the warehouse with clear zones
- Assign responsibilities to specific employees
- Print labels with recognizable codes for faster work
Do you have questions or need help? Feel free to contact us by phone at +31 (0)71 30 20 310 or send an email to support@easyflor.nl.