- (VIDEO) Creating administration and location
- (VIDEO) Creating debtors
- (VIDEO) Creating shop users
- Assigning Seat and Place Numbers (Via EKT)
- Automatic redistribution from location to location to debtor upon sale
- Creating a Shop User (Webshop)
- Creating and setting up a new customer (debtor)
- Creating contact persons
- Creating Sub Shop Users
- Creating VMP for debtors
- How to Create a Purchase Debtor in Easyflor
- Link Debtors to Employees
- Order Days
- Setting up administration and location
- Setting up cancellation time
- Setting Up Invoice Numbers
Link Debtors to Employees
How do you link specific debtors to an employee in Easyflor?
What is linking debtors to employees?
Sometimes you want an employee to only see certain customers (debtors) in the system, not all customers. By linking debtors to an employee, you limit which customers this person can view and edit.
Why would you want this?
- Privacy: Not everyone needs to see all customers
- Overview: An employee only sees their own customers
- Clarity: Each employee works with their own customer list
- Responsibility: You can make employees responsible for specific customers
- Security: Sensitive customer information stays limited to the right people
Examples of when you use this:
Example 1: Account managers
- Account manager A serves customers from North Holland
- Account manager B serves customers from South Holland
- Both only see their own customers
Example 2: Intern
- An intern may only see a few test customers
- Not the real customers of the company
Example 3: External employee
- An external employee is temporarily working with you
- This person may only see the customers they work with
How do you link debtors to an employee?
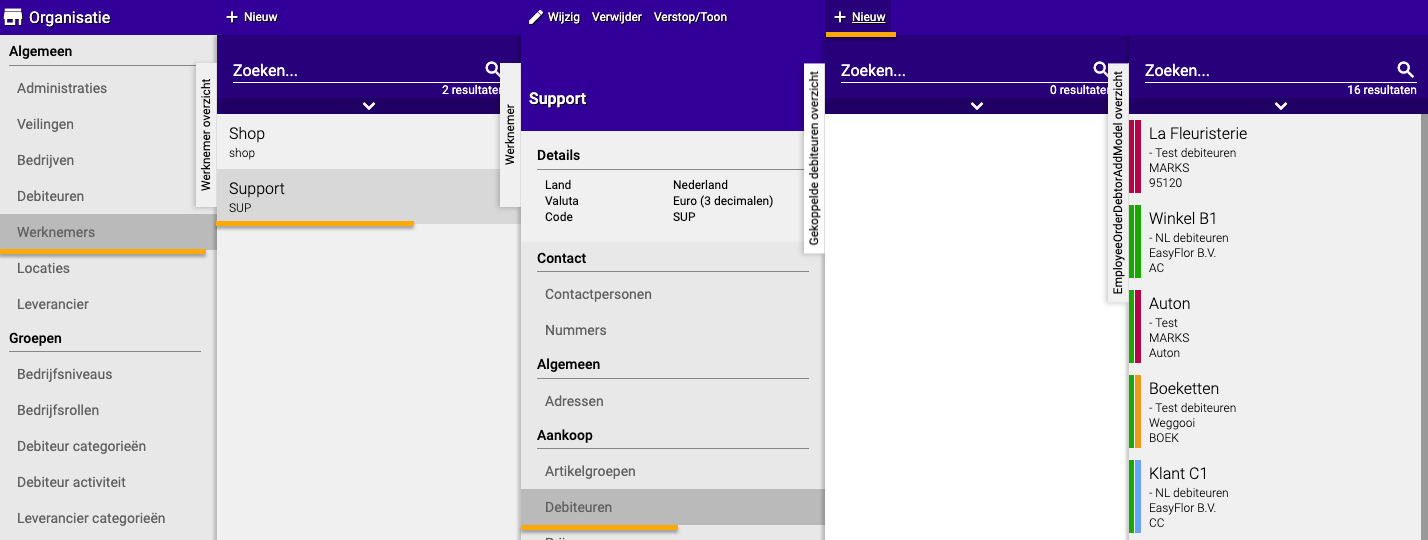
Step 1: Go to employees
- Click on the "Organisation" tile
- Click on "Employees"
Step 2: Select the employee
- Click on the employee to whom you want to link customers
Step 3: Go to debtors
- Click on "Debtors" (in the employee menu)
Step 4: Add debtors
- Click on "+New"
- Click on each debtor (customer) you want to link
- Repeat until all desired debtors are linked
- Done!
What happens after linking?
For the employee:
- The employee sees only the linked debtors
- All other customers are invisible to this person
- This applies in all parts of Easyflor (orders, invoices, etc.)
For administrators:
- Administrators can still see all customers
- You can adjust or remove the links later
Extra tips
Tip 1: Check the links regularly
- Is an employee working with new customers? Add them!
- Is an employee no longer working with certain customers? Remove the link
Tip 2: Multiple employees, same customer
- You can link the same customer to multiple employees
- For example: both the account manager and the back office see this customer
Tip 3: No links = all customers
- If you do not link any debtors to an employee, this person sees all customers
- So only link if you really want to restrict!
Tip 4: Always test it
- Have the employee log in and check if they see the right customers
- This prevents confusion
Summary: Quick steps
- Organisation → Employees
- Select the employee
- Click on Debtors
- Click on +New
- Select all desired debtors
- Done!
Now the employee only sees the linked customers in the system!
Do you have questions or need help? Feel free to contact us by phone at +31 (0)71 30 20 310 or send an email to support@easyflor.nl.