- (VIDEO) Creating administration and location
- (VIDEO) Creating debtors
- (VIDEO) Creating shop users
- Assigning Seat and Place Numbers (Via EKT)
- Automatic redistribution from location to location to debtor upon sale
- Creating a Shop User (Webshop)
- Creating and setting up a new customer (debtor)
- Creating contact persons
- Creating Sub Shop Users
- Creating VMP for debtors
- How to Create a Purchase Debtor in Easyflor
- Link Debtors to Employees
- Order Days
- Setting up administration and location
- Setting up cancellation time
- Setting Up Invoice Numbers
Creating a Shop User (Webshop)
How do you create a shop user in Easyflor?
What is a shop user?
A shop user is an account that allows a customer (debtor) to log into your webshop to place orders. Every customer who wants to order through the webshop needs such an account.
Why create shop users?
- Online ordering: Customers can order 24/7 through the webshop
- Independence: Customers don't need to call or email for orders
- Overview: Customers see their own order history
- Efficiency: You save time because customers order themselves
- Stock insight: Customers immediately see what's in stock
Part 1: Creating a shop user for an existing customer
Step 1: Go to debtors
- Click on "Organisation"
- Click on "Debtors"
Step 2: Select the customer
- Click on the debtor for whom you want to create a shop user
Step 3: Go to contact persons
- Click on "Contact persons"
- Select the contact person to whom you want to assign the shop user
- Don't have a contact person yet? Create one first by clicking "+New" and filling in the details.
Step 4: Go to shop users
- Click on "Shop users"
Step 5: Create a new shop user
- Click on "+New"
Step 6: Fill in the details
Required fields:
- Username: The name with which the customer logs in (for example "jan.jansen" or "flowertrade.the.rose")
- Password: The password for the customer
- Repeat password: Type the password again — must be exactly the same!
- Language: The language the user sees in the webshop
Optional setting:
- May be excluded from the shop: Determine if this debtor can be temporarily excluded (for example in case of non-payment)
Step 7: Save
- Click on "Save"
Step 8: Pass on the login details
- Send the username and password to the customer
- The customer can now log into the webshop!
Part 2: Letting new customers register on the webshop
What is self-registration?
With self-registration, new customers can sign up for your webshop themselves. You don't have to manually create an account for every new customer.
How does it work?
For the customer:
- The customer goes to your webshop
- The customer sees a registration field
- The customer fills in their details and requests access
- The customer waits for approval
For you (the administrator):
- You receive an email with the registration request
- You review the new customer's details
- You approve or reject the request
- Upon approval: the customer can log in!
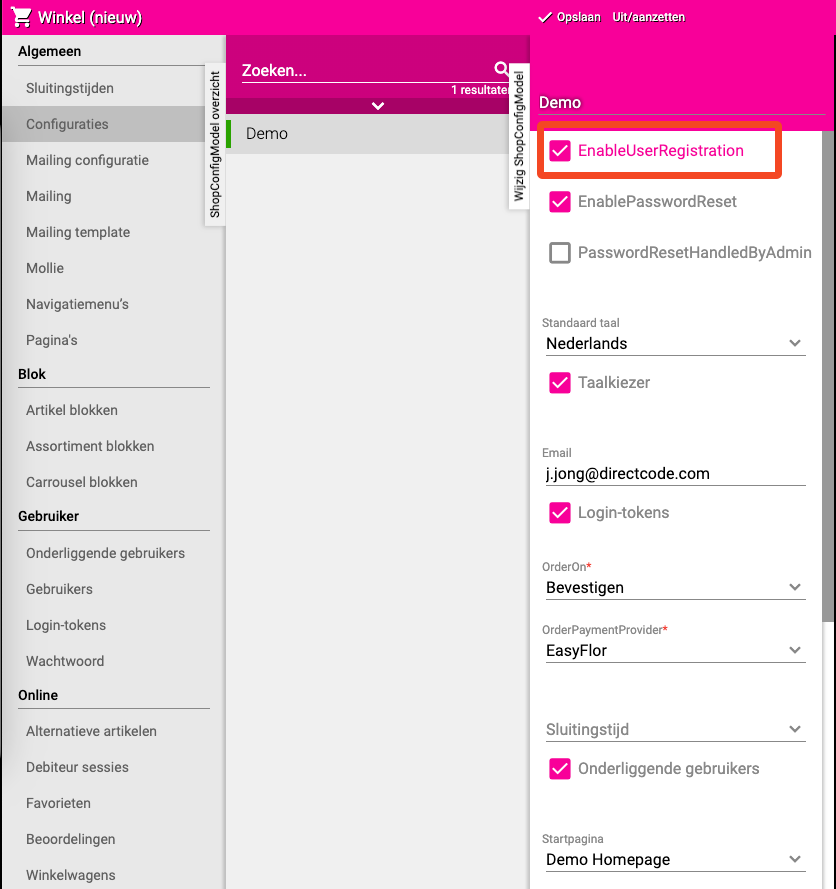
Enabling self-registration
- Click on the "Shop" tile
- Click on "Configuration"
- Select your webshop
- Find the checkbox "EnableUserRegistration"
- Check this
- Click on "Save"
Sub shop users
A sub shop user is an account linked to an existing shop user. You use this when your customer in turn has their own customers who also need to be able to order through the webshop. The sub shop user then orders through your customer's account, but with their own login details.
Logging in as a shop user (login token)
When do you use this?
If you want to check how the webshop looks for a specific customer, or if you want to reproduce a problem that a customer is experiencing, you can log in as that shop user via a login token.
How do you generate a login token?
- Go to the shop user (via Organisation → Debtors → [Customer] → Contact persons → [Contact person] → Shop users → select the shop user)
- Click on "Login token"
- Choose the shop configuration you want to log into
- Click "Apply"
- A link is generated
- Copy this link and paste it into a new tab in your browser
- You are now logged in as this shop user and see the webshop exactly as the customer sees it
Important tips
- Use clear usernames — Make usernames recognizable (for example "jan.flowers" or "floristdevries"), not "user123" or "xyz"
- Choose secure passwords — Use a combination of letters and numbers, minimum 8 characters
- Pass on login details safely — Don't send passwords by regular email. Call the customer or use a secure method
- Always test first — Create a test account and log in to check if everything works
- Keep track of registration requests — Regularly check your email for new requests and respond quickly (within 24 hours)
Common mistakes
- Passwords don't match — Check carefully that both passwords are exactly the same
- No contact person selected — First create a contact person, then select them
- Wrong language chosen — Ask the customer which language they want
- Missed registration requests — Set a reminder to check daily
- Self-registration not enabled — Check if "EnableUserRegistration" is checked
Summary
To manually create a shop user, go to Organisation → Debtors → select the customer → Contact persons → select the contact person → Shop users → +New. Fill in username, password (2x) and language and click Save.
To enable self-registration, go to Shop → Configuration → select your webshop → check "EnableUserRegistration" → Save.
To log in as a shop user, go to the shop user → click "Login token" → choose the shop configuration → click "Apply" → paste the generated link into a new tab.
Do you have questions or need help? Feel free to contact us by phone at +31 (0)71 30 20 310 or send an email to support@easyflor.nl.