- (VIDEO) Creating administration and location
- (VIDEO) Creating debtors
- (VIDEO) Creating shop users
- Assigning Seat and Place Numbers (Via EKT)
- Automatic redistribution from location to location to debtor upon sale
- Creating a Shop User (Webshop)
- Creating and setting up a new customer (debtor)
- Creating contact persons
- Creating Sub Shop Users
- Creating VMP for debtors
- How to Create a Purchase Debtor in Easyflor
- Link Debtors to Employees
- Order Days
- Setting up administration and location
- Setting up cancellation time
- Setting Up Invoice Numbers
Creating VMP for debtors
Creating and sharing a VMP connection with debtors
Introduction: What is a VMP connection?
A VMP connection is a special link between your Easyflor system and your customer's (debtor's) system. VMP stands for "Veilingmanager Protocol" and ensures that your customer can automatically see your stock and prices in their own system. They can then order directly from their own software without having to log in to a website.
Why create a VMP connection?
You want to create a VMP connection because:
- Customers can order directly from their own system (e.g., Florisoft)
- Ordering is faster and easier for customers
- Fewer errors occur thanks to automatic connection
- Customers see your stock and prices in real-time
- It is professional and saves time for both parties
- Large customers often require this as a condition
- Orders automatically come into Easyflor
Practical example: A florist uses Florisoft as their POS system. With VMP, they see your stock in Florisoft and can order directly without going to your webshop.
How do you create a VMP connection?
This is done in three parts: creating the VMP user, sharing details with the customer, and configuring extra settings.
Part 1: Creating the VMP user
Step 1: Go to the debtor
Open the Organization tile
- Go to the "Organization" tile
- You see a list of all debtors (customers)
Select the debtor
- Find the debtor for whom you want to create a VMP
- Click on the debtor to open it
- You see all information about this customer
Step 2: Create or select a contact person
A contact person must exist to link the VMP to.
Create a new contact person (if needed)
If there is no contact person yet, or you want a separate one for VMP:
- Click on "Contact person"
- Click on "New" or the "+" icon
Filling in the details:
Surname (required):
- This is the only field you must fill in
- Fill in the real surname if you know it
- Don't know the surname? Enter for example "General" or "VMP user"
- This is only for identification in your system
Other fields:
- First name, email, phone are optional
- Fill in if you know them, otherwise leave empty
Save
- Click "Save"
- The contact person is now created
Using an existing contact person
If a contact person already exists:
- Select the correct contact person from the list
- You can use this for the VMP
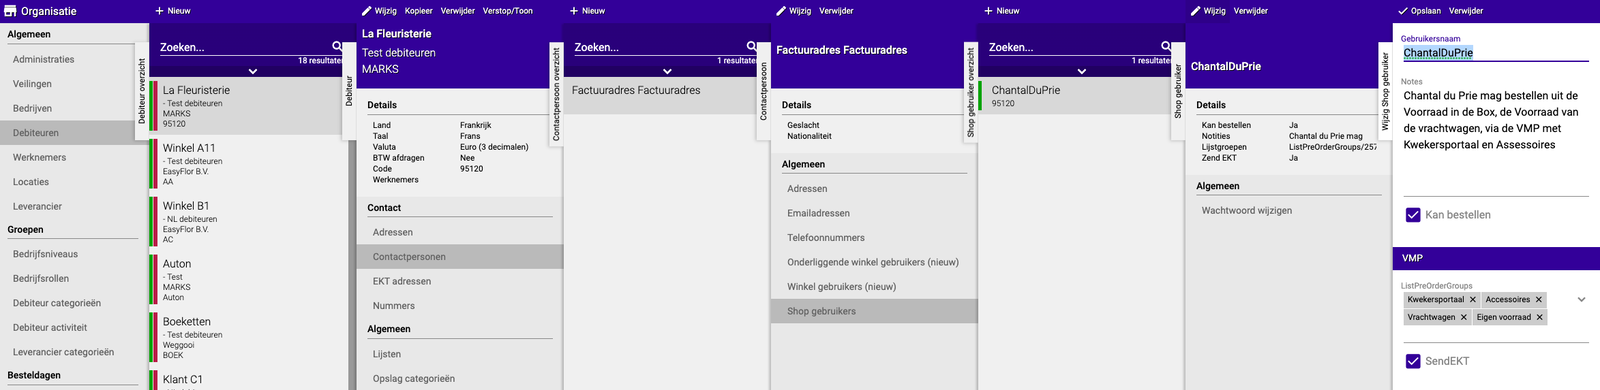
Step 3: Create the VMP user
Now you create the actual VMP user.
Open the Shop users menu
- Make sure you have selected the contact person
- Click on "Shop users"
- Click on "New" or the "+" icon
Choosing a username
Important:
- Choose a recognizable username
- For example: "ChantalDuPrie" or "FloristJansen"
- Write it down! You will need it later to share
- Do not use spaces or special characters
- Uppercase and lowercase letters are allowed
Tips for usernames:
- Use name + company: "JanFlora"
- Or company name: "FlowershopAmsterdam"
- Or function: "PurchaseVanDijk"
- Keep it short and clear
Setting the password
Important:
- Enter a password
- Enter it again (for confirmation)
- Both must be exactly the same
- Write down this password!
⚠️ WARNING:
- Easyflor does NOT remember passwords
- If you forget the password, you CANNOT retrieve it
- You must then create a new password
- Therefore keep the password safe (e.g., in a password manager)
Tips for passwords:
- Make it strong enough (at least 8 characters)
- Use letters and numbers
- Write it down immediately in a secure place
- Only share it with the customer via a secure way (phone, not email)
Save
- Check that username and password are correctly filled in
- Click "Save"
- The VMP user is now created
Done with part 1! The basic VMP has been created.
Part 2: Sharing VMP details with the customer
Now you must give the customer the login details so they can set up the VMP connection in their system.
Step 1: Format the username
Watch the format!
The username you share is NOT just the name you chose, but a combination:
Format: YourCompanyName/Username
Example:
- Your company name in Easyflor: FlowerWholesale
- Chosen username: ChantalDuPrie
- What you share with the customer: FlowerWholesale/ChantalDuPrie
Another example:
- Your company name: JansenFlora
- Chosen username: CustomerVMP
- What you share: JansenFlora/CustomerVMP
Where do I find my company name?
The company name appears on the tab of your browser when you have Easyflor open. For example, if your tab is named "FlowerWholesale - Easyflor", then FlowerWholesale is your company name.
Important:
- The "/" (slash) must be between
- Copy the company name exactly as it appears on the tab
- Uppercase and lowercase letters must match exactly
- No spaces
Step 2: Choose the URL
The URL is the web address the customer must use to connect.
Standard URL (for most customers): https://server-vmp.easyflor.eu/VMP0p7.svc
Special URL for Florisoft users: https://server-vmp.easyflor.eu/VMP0p9.svc
How do you know which URL?
- Ask the customer which system they use
- Florisoft: Use VMP0p9.svc
- Other systems (FloraHolland, own system, etc.): Use VMP0p7.svc
- When in doubt: Ask the customer or use VMP0p7.svc
Step 3: Share details with customer
What you must share:
Send the customer the following information: VMP Login details:
Username: [YourCompany]/[Username] Password: [the chosen password] URL: https://server-vmp.easyflor.eu/VMP0p7.svc (or VMP0p9.svc for Florisoft)
Example message to customer: Dear [Customer name], Here are the details for the VMP connection: Username: FlowerWholesale/ChantalDuPrie Password: [password] URL: https://server-vmp.easyflor.eu/VMP0p7.svc Kind regards, [Your name]
Security:
- Do NOT send the password by email (unsafe)
- Call the password by phone
- Or use a secure messaging app
- Or send the password in a separate message
Part 3: Extra settings (optional but important)
There are some additional settings you probably want to configure.
Setting 1: Link list groups (REQUIRED for visibility)
Why important?
- Without list groups, the customer sees NO products!
- You determine which products the customer may see via list groups
Setting up list groups
- Go back to the VMP user you created
- Find the field "List groups" or "Product groups"
- Select which list groups this customer may see
Examples:
- All products: Select all list groups
- Only roses and tulips: Select only those list groups
- Only offers: Select only the "Offers" list group
Note: Without list groups, the customer sees nothing in the VMP!
Setting 2: Send EKT (optional)
What are EKTs?
- EKT = Electronic Purchase Transaction
- These are digital purchase confirmations
- Comparable to an order confirmation by email
When to set EKT? If the customer wants to receive EKTs from their VMP orders
Enable EKT
- At the VMP user
- Find the checkbox "Send EKT"
- Check this if the customer wants to receive EKTs
- Leave it unchecked if they don't want EKTs
Setting 3: EKT for own stock (extra optional)
When needed? If the VMP user must also receive EKTs from products in their own stock (not just purchases via VMP)
Set up
- Go to "Configuration" → "Distribution"
- Find the settings:
- "Use EKT" → Enable
- "Send EKT automatically" → Enable
- Save
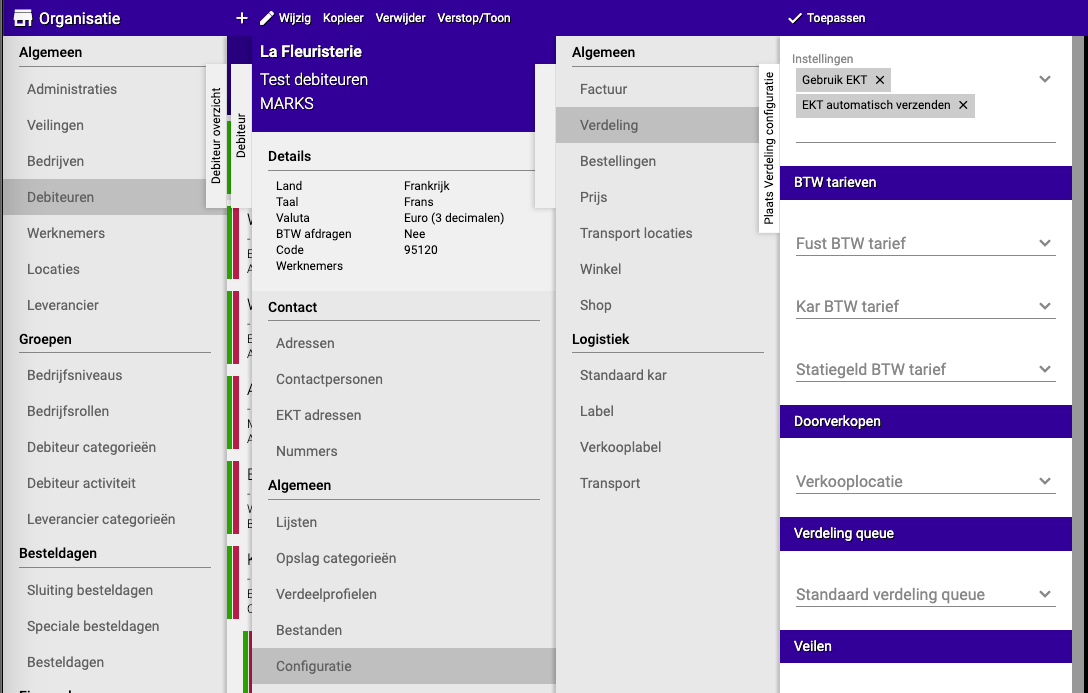
Note: This is only needed in specific situations, usually not standard.
Setting 4: Direct redistribution with Seat/Place number (optional)
When needed? If purchases from the debtor via VMP must be automatically redistributed to their clock location
What are Seat and Place number?
- These are codes from the auction/clock
- Seat = the location at the auction
- Place number = the specific number
Set up
- Go to the VMP user
- Click on "EKT addresses"
- Select or create a new EKT address
- Fill in the details:
- Seat: The seat number
- Place number: The place number
- Save

Note: You need this information from the customer themselves. Ask them if this function is needed.
Practical examples
Example 1: Standard VMP for florist with Florisoft
- Customer: Florist "De Roos", uses Florisoft
- Action:
- Organization → Select "De Roos"
- Create contact person "General"
- VMP user "DeRoosVMP", choose password
- Share: "FlowerWholesale/DeRoosVMP", password, URL: VMP0p9.svc (Florisoft!)
- List groups: All products
- Send EKT: On
- Result: Customer can order directly via Florisoft
Example 2: VMP with limited assortment
- Customer: Wholesale, may only see offers
- Action:
- Create VMP as normal
- List groups: Select only "Offers"
- Rest standard
- Result: Customer only sees offers via VMP
Example 3: Password forgotten
- Problem: Customer calls, password lost
- Solution:
- Go to VMP user
- Create NEW password
- Note this well
- Share new password with customer
- Username and URL remain the same
- Result: Customer can log in again
Example 4: Wrong URL used
- Problem: Florisoft customer cannot connect
- Check: Which URL do they have?
- Solution:
- If they use VMP0p7.svc: Change to VMP0p9.svc
- Share new URL
- Customer updates URL in Florisoft
- Result: Connection works now
Important tips
Tip 1: Note everything immediately
- Write down username and password as soon as you create them
- In a secure document or password manager
- Easyflor cannot retrieve it for you
Tip 2: Test the connection
- Ask the customer to test after setup
- Can they log in?
- Do they see products?
- Solves any problems immediately
Tip 3: Don't forget list groups
- Most important setting!
- Without list groups, customer sees nothing
- Always check this after creating
Tip 4: Correct URL for Florisoft
- Florisoft = VMP0p9.svc
- Other systems = VMP0p7.svc
- Always ask which system the customer uses
Tip 5: Safely share password
- NEVER by email
- Call it by phone or use secure chat
- Consider requiring a strong password
Tip 6: Document per customer
- Note in a document which customer has which VMP
- With username (not password!)
- Useful for questions or problems
Frequently asked questions
Question: Can a customer have multiple VMPs?
- Yes, you can create multiple VMP users
- For example for different employees
- Or different departments
Question: What if the customer forgets the password?
- You CANNOT retrieve it in Easyflor
- Create a new password
- Share this with the customer
- Username remains the same
Question: How many VMP connections can I create?
- Unlimited
- For every customer who wants it
- No extra costs per VMP
Question: Does the customer see all updates immediately?
- Yes, VMP is real-time
- New stock is directly visible
- Price changes also directly
Question: Can I delete a VMP later?
- Yes, delete the VMP user
- The customer can then no longer log in
- Only do this if the cooperation stops
Question: Why does the customer see no products?
- Most common cause: No list groups linked
- Check whether list groups are set
- Or check whether products are in those list groups
What to do in case of problems?
Problem: Customer cannot log in
- Check username format: Company/User
- Check if password is correct (case-sensitive!)
- Check if correct URL is used (VMP0p7 vs VMP0p9)
- Create new password if needed
Problem: Customer sees no products
- Check whether list groups are linked to VMP user
- Check whether there are products in those list groups
- Refresh the VMP connection at the customer
Problem: Wrong URL used
- Florisoft customers must use VMP0p9.svc
- Other systems use VMP0p7.svc
- Share correct URL with customer
Problem: EKTs not arriving
- Check if "Send EKT" is enabled at VMP user
- Check email address of contact person
- Check spam folder at customer
Problem: Password forgotten
- CANNOT be retrieved
- Create new password at VMP user
- Share this securely with customer
- Write it down this time!
Summary
Creating and sharing a VMP connection with customers is done in three parts:
Part 1 - Creating the VMP user:
- Go to Organization → select debtor
- Select contact person (or create new one with at least surname, for example "General")
- At contact person → Shop users → New
- Choose username and password (enter twice) → Save
- Note: Passwords are NOT saved, write them down immediately!
Part 2 - Sharing details with customer:
- Username in format: YourCompany/Username (e.g., FlowerWholesale/ChantalDuPrie)
- Password (share securely, not by email!)
- URL: https://server-vmp.easyflor.eu/VMP0p7.svc (standard) or VMP0p9.svc (for Florisoft users)
Part 3 - Extra settings:
- Link list groups (REQUIRED!): Otherwise customer sees no products
- Send EKT (optional): Check if customer wants EKTs from VMP purchases
- EKT own stock (optional): Via Configuration → Distribution → "Use EKT" and "Send EKT automatically"
- Seat/Place number (optional): For automatic redistribution to clock, fill in at EKT addresses
Why important:
- Customers can order directly from their own system
- Real-time stock and prices visible
- Faster and fewer errors
- Professional cooperation with large customers
Remember: Write down username and password immediately — they cannot be retrieved!
Do you have questions or need help? Feel free to contact us by phone at +31 (0)71 30 20 310 or send an email to support@easyflor.nl.