- (VIDEO) Creating user and employee
- Adjusting sales unit order
- Creating a user and employee
- Creating an accounting integration
- Creating and maintaining VAT rates
- Creating and using distribution profiles
- Filtering growers or suppliers
- How do I charge no VAT for my customers?
- Importing an Excel sheet / Creating an import template
- Receiving copy emails (mail cc) of order confirmations and/or invoices
- Setting up and executing Flora settlement
- Setting Up and Using AI2
- Setting up currency conversion
- Setting up distribution: Automatically send EKT messages to a KOA debtor
- Setting up payment reminders
- Setting up payment terms
- Setting up Route module
- Setting up SEPA
- Transport and carriers
- VMP article group matching
Adjusting sales unit order
How do you adjust the order of sales units?
What are sales units?
Sales units are the ways you count and price products in Easyflor. By default, Easyflor works with stems (loose flowers), but you can also choose bunches, containers, layers or trolleys. You determine the order in which you want to price: for example first per bunch, then per container, then per stem.
Why set up sales units?
- Work as you're used to: Some people think in bunches, others in stems
- Different per user: Jan can work in bunches, Marie can work in stems
- Convenience: You immediately see prices in the unit you use
- Flexible: You determine the order yourself (first bunch, then container, then stem, etc.)
- No converting: You don't have to keep calculating yourself how many bunches fit in a container
- Clear: You immediately see what you're working with
When do you adjust sales units?
Examples:
- You're used to thinking in bunches instead of stems
- You work a lot with containers and want to see those first
- You have employees who each have their own preference
- You want to work faster by using the unit you understand best
- You find it more convenient to price first in bunches and then in stems
What sales units are available?
Easyflor has five default sales units:
1. Stem
What is it? A loose flower Example: 1 rose = 1 stem
2. Bunch
What is it? A bundle of flowers (usually 10 stems) Example: 1 bunch of roses = 10 stems
3. Container
What is it? A bucket or tray with bunches (e.g., 10 bunches) Example: 1 container = 10 bunches = 100 stems
4. Layer
What is it? A layer in a trolley (e.g., 5 containers) Example: 1 layer = 5 containers = 50 bunches = 500 stems
5. Trolley
What is it? A whole trolley with multiple layers (e.g., 4 layers) Example: 1 trolley = 4 layers = 20 containers = 200 bunches = 2000 stems
How does the order of sales units work?
Default order:
Normally Easyflor works like this:
1. Stem (smallest unit)
2. Bunch
3. Container
4. Layer
5. Trolley (largest unit)
You determine the order!
You can adjust the order by clicking on units. The order in which you click is the order in which prices are shown.
Example: If you click "Bunch" first, then "Container":
1. Bunch (clicked first)
2. Container (clicked second)
3. Stem (rest goes from small to large)
4. Layer
5. Trolley
What does this mean?
- Easyflor shows prices per bunch first
- Then per container
- Then per stem, layer and trolley
Part 1: Setting sales units for yourself
Step 1: Go to your user settings
- Make sure you're logged into Easyflor
- Click in the top right on your username or profile icon
- Click on "Settings" or "User settings"
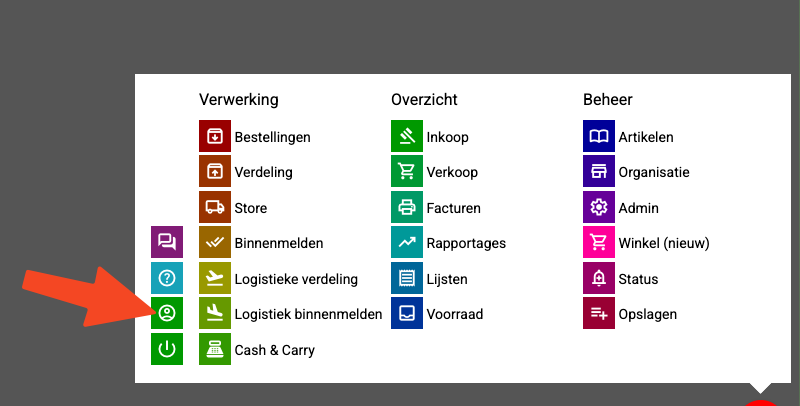
Step 2: Open the sales units setting
- Look at the list of settings
- The second option from the top is the setting for sales units
- Click on this option
Step 3: View the available units
You now see a menu with five sales units:
- Stem
- Bunch
- Container
- Layer
- Trolley
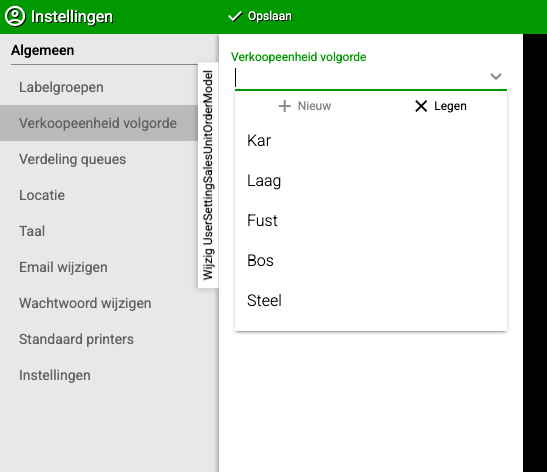
Step 4: Click in the order you want
Important: The order in which you click is the order in which prices are shown!
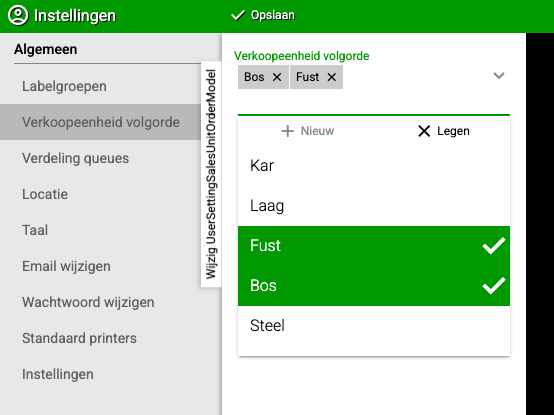
Example 1: You want bunches first, then containers
- Click first on "Bunch"
- Then click on "Container"
- Leave the rest as is
Result:
1. Bunch (clicked first)
2. Container (clicked second)
3. Stem (rest automatically from small to large)
4. Layer
5. Trolley
Example 2: You want containers first, then trolleys
- Click first on "Container"
- Then click on "Trolley"
Result:
1. Container (clicked first)
2. Trolley (clicked second)
3. Stem (rest automatically from small to large)
4. Bunch
5. Layer
Step 5: Save or close the menu
- The setting is automatically saved
- Close the menu
- From now on you see prices in the order you set!
Step 6: Test it
- Go to a product page or price list
- Check if the prices are now in your desired order
- Does it work? Great! If not? Go back and adjust the order
Part 2: Setting sales units for another user (admins only)
When do you use this?
If you're an admin, you can set sales units for other users. For example: you want to set up for a new employee that he works in bunches.
Step 1: Go to users
- Click on the "Admin" tile
- Click on "Users"
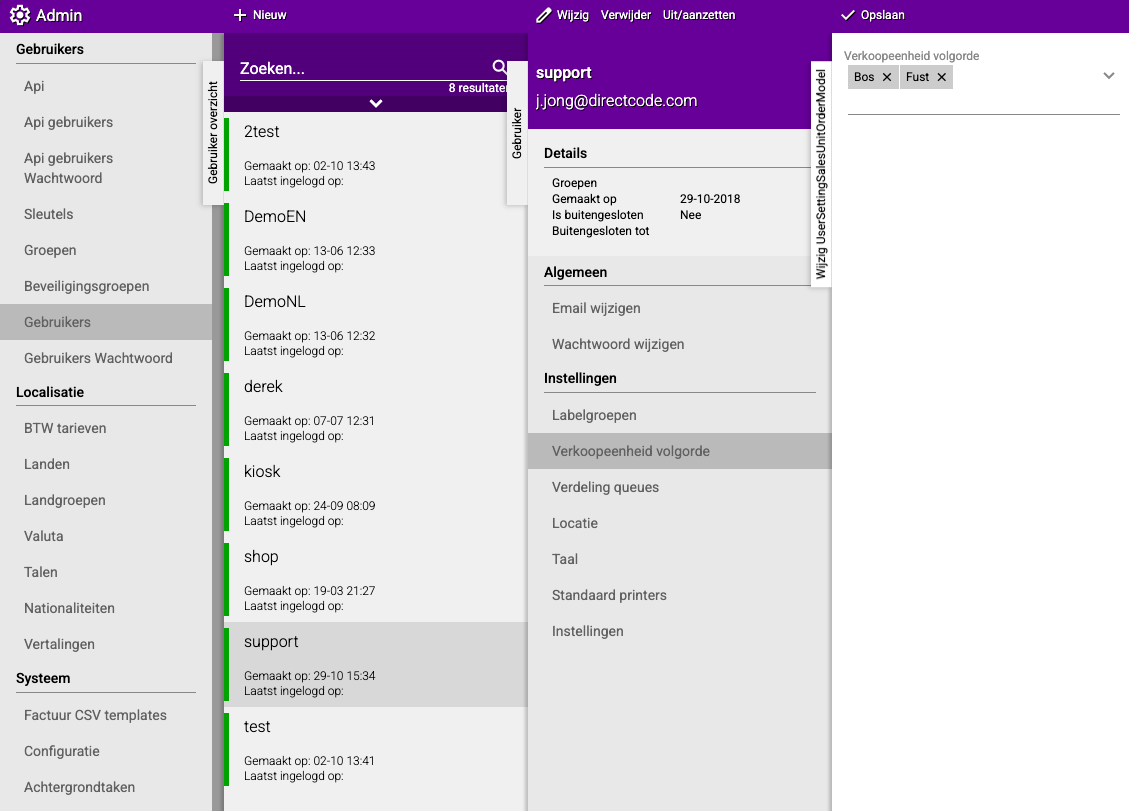
Step 2: Select the user
- Click on the user for whom you want to set the sales units
Step 3: Go to this user's settings
- Find the setting for sales units
- This is the same setting as in Part 1
Step 4: Set the sales units
Follow exactly the same steps as in Part 1, Step 4:
- Click in the order this user needs
- The order in which you click is the order in which prices are shown
- The rest goes automatically from small to large
Step 5: Save
- The setting is saved
- The user now sees prices in the order you set
Practical examples
Example 1: Jan works with bunches
Situation: Jan is used to thinking in bunches and wants to see prices per bunch.
Setting:
- Go to user settings
- Click first on "Bunch"
- Leave the rest as is
Result for Jan:
1. Bunch (he sees bunch prices first)
2. Stem
3. Container
4. Layer
5. Trolley
Example 2: Marie works with containers
Situation: Marie works in the warehouse and thinks in containers. She wants to see container prices first, then bunches.
Setting:
- Go to user settings
- Click first on "Container"
- Then click on "Bunch"
Result for Marie:
1. Container (she sees container prices first)
2. Bunch (then bunch prices)
3. Stem
4. Layer
5. Trolley
Example 3: Piet works with trolleys
Situation: Piet loads trucks and works with whole trolleys. He wants to see trolley prices first.
Setting:
- Go to user settings
- Click first on "Trolley"
- Then click on "Layer"
Result for Piet:
1. Trolley (he sees trolley prices first)
2. Layer (then layer prices)
3. Stem
4. Bunch
5. Container
Important tips
Tip 1: Each user can be different
- Jan can work in bunches
- Marie can work in containers
- Piet can work in trolleys
- Everyone sees their own preferred order!
Tip 2: The rest goes automatically
- You only need to click the first few units
- The rest is automatically filled in from small to large
- You don't need to set all five manually
Tip 3: Test it immediately
- Adjust the setting
- Go to a product page
- Check if it's correct
- Not right? Adjust again
Tip 4: Not a permanent choice
- You can always change the setting again
- Try different orders
- Choose what works best for you
Tip 5: Ask employees their preference
- As admin: ask employees how they want to work
- Set it up for them as they like it
- Then everyone works more efficiently
Tip 6: Think about your daily work
- Do you mostly work with bunches? Put Bunch first
- Do you mostly work with containers? Put Container first
- Choose what you use most
Common mistakes
Mistake 1: Wrong order clicked
- You accidentally click "Trolley" first when you wanted "Bunch"
- Result: You see trolley prices first
- Solution: Go back to the setting and click again in the correct order
Mistake 2: Thinking it changes for everyone
- You adjust your setting and think it applies to everyone
- Result: Colleagues still see their own order
- Solution: This is good! Each user has their own setting
Mistake 3: Too many units clicked
- You click all five units in a certain order
- Result: That's allowed, but usually not necessary
- Solution: Just click the first 1-2 units, the rest goes automatically
Mistake 4: Not saved
- You think you need to save with a button
- Result: You search for a save button that isn't there
- Solution: It's saved automatically, just close the menu
Mistake 5: Set for wrong user (admins)
- As admin you accidentally set for the wrong person
- Result: That person sees an order they don't want
- Solution: Always check carefully for which user you're setting it
Visual overview of the process
SETTING FOR YOURSELF:
    ↓
Click your name top right → Settings
    ↓
Second option from top → Sales units
    ↓
Click units in desired order
(For example: first Bunch, then Container)
    ↓
Close menu (automatically saved)
    ↓
DONE! You now see prices in your order
    ↓
────────────────────────────────────────
    ↓
SETTING FOR SOMEONE ELSE (admin):
    ↓
Admin → Users → Select user
    ↓
Find sales units setting
    ↓
Click units in desired order
    ↓
Close menu (automatically saved)
    ↓
DONE! That user now sees prices in that order
Summary
Sales units determine in what order you see prices in Easyflor, and you can set this differently per user. By default, Easyflor works with five sales units:
- Stem: a loose flower
- Bunch: a bundle of flowers (usually 10 stems)
- Container: a bucket or tray with bunches
- Layer: a layer in a trolley with multiple containers
- Trolley: a whole trolley with multiple layers
To set the sales units for yourself, click in the top right on your username or profile icon and go to "Settings" or "User settings". The second option from the top is the setting for sales units. When you open it, you see a menu with the five available units. The order in which you click the units is the order in which prices are shown - this is the most important principle.
If you click for example "Bunch" first and then "Container", the order becomes:
- Bunch (clicked first)
- Container (clicked second)
- Stem (rest goes automatically from small to large)
- Layer
- Trolley
So you only need to click the first few units that are most important to you, the remaining units are automatically filled in from small to large. The setting is automatically saved when you close the menu, so you don't need to press a save button.
If you're an admin, you can also set the sales units for other users by going to Admin, then Users, selecting a user and finding the same setting. This works exactly the same way as setting for yourself. The advantage of this system is that each user can have their own preference: Jan can work in bunches, Marie can work in containers and Piet can work in trolleys, all simultaneously in the same system. Always test after setting whether you see the prices in the correct order by going to a product page, and adjust again if it's not quite right.
Do you have questions or need help? Feel free to contact us by phone at +31 (0)71 30 20 310 or send an email to support@easyflor.nl.