- (VIDEO) Creating user and employee
- Adjusting sales unit order
- Creating a user and employee
- Creating an accounting integration
- Creating and maintaining VAT rates
- Creating and using distribution profiles
- Filtering growers or suppliers
- How do I charge no VAT for my customers?
- Importing an Excel sheet / Creating an import template
- Receiving copy emails (mail cc) of order confirmations and/or invoices
- Setting up and executing Flora settlement
- Setting Up and Using AI2
- Setting up currency conversion
- Setting up distribution: Automatically send EKT messages to a KOA debtor
- Setting up payment reminders
- Setting up payment terms
- Setting up Route module
- Setting up SEPA
- Transport and carriers
- VMP article group matching
Creating an accounting integration
How do you create an accounting integration in Easyflor?
What is an accounting integration?
An accounting integration is an automatic connection between Easyflor and your accounting software (such as SnelStart, Twinfield, or e-Boekhouden). This allows your invoices and financial data to be automatically transferred to your accounting system, without having to manually re-enter everything.
Why use an accounting integration?
- Save time: You don't have to manually re-enter all invoices in your accounting software
- No errors: Automatic transfer prevents typing errors
- Always up-to-date: Your accounting is automatically updated
- Less work: Your accountant has all the data immediately
- Clear overview: All financial data is in one place
- Professional: Your administration is always neatly organized
When do you use an accounting integration?
Examples:
- You work with external accounting software like SnelStart or Twinfield
- You want to automatically send your invoices to your accountant
- You want to save time by not entering everything twice
- You want to prevent errors when copying amounts
Which accounting packages are supported?
Easyflor works with the following programs:
- SnelStart
- Twinfield
- Exact
- Exact Online
- King
- Multivers
- e-Boekhouden
Note: Other packages can also be connected, but this is custom work. The costs for this are calculated based on the number of hours required.
Part 1: Creating the integration
Step 1: Go to administration export
- Click on the "Admin" tile
- Click on "System"
- Click on "Configuration"
- Click on "Export"
- Click on "Administration"
Step 2: Create a new integration
- Click "New" at the top
Step 3: Fill in the basic information
1. Name: Give the integration a clear name using the name of your accounting software (e.g. "SnelStart", "Twinfield", "e-Boekhouden")
2. Administrations: Choose which administration(s) may be exported
3. Accounting package: Choose which accounting software you use from the list
4. Data to synchronize: Choose what you want to export (invoices, debtors, creditors, articles, VAT data)
5. Start date: From which date should data be exported? Usually today's date or the start of your fiscal year
6. Delay: Usually enter 0d (no delay)
Step 4: Save
- Click "Save"
Part 2: Entering login credentials for your accounting software
This varies per accounting software!
For e-Boekhouden:
Enter a Username and Security Code (found in e-Boekhouden under Management → Settings → Integrations → API/SOAP).
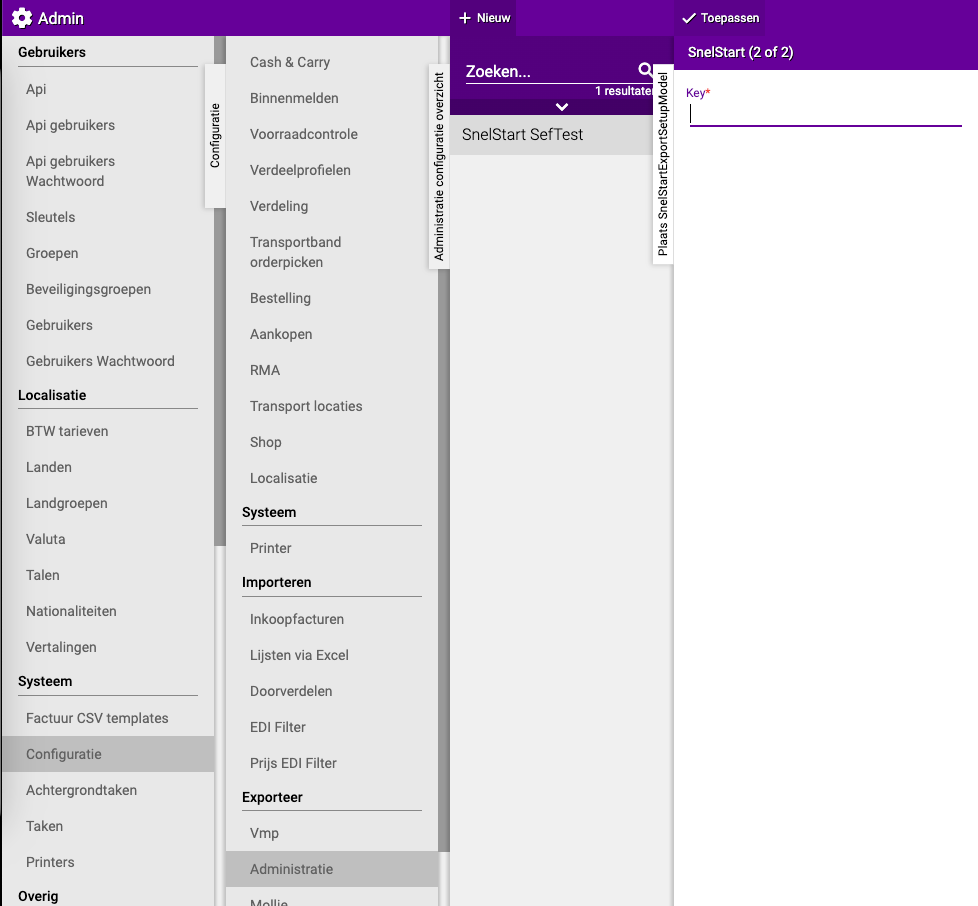

For SnelStart:
Enter a KEY that you receive from SnelStart. Click "Apply".
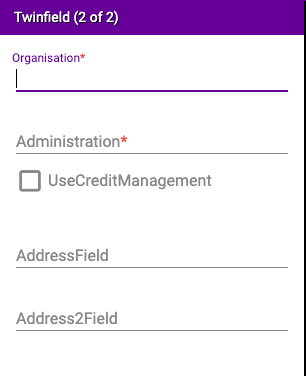
For Twinfield:
Enter various details (see image). Note: For "UseCreditManagement", contact an Easyflor consultant. Default: unchecked.
For Exact:
Provide an email address.
Part 3: Checking the configuration
- Go back to Admin → System → Configuration → Export → Administration
- Click on the integration you created → "Configuration" to verify everything is set up correctly
Part 4: Filling in accounting numbers (Rules)
What are accounting numbers?
Accounting numbers (general ledger numbers) are codes your accountant uses to sort income and expenses. Ask your accountant for these numbers.
Step 1: Creating VAT rates
Why VAT rates first?
You will need the VAT rates later when setting up articles.
More information about VAT rates in Easyflor can be found in the guide: Creating and maintaining VAT rates
How do you create a VAT rate?
- Menu: Admin → Configuration → Export → Administration → your integration
- Click "Rules" → "VAT Rates" → "New"
Fill in: name (e.g. "VAT NL High"), general ledger number, VAT code, administration. Click "Apply".
Create separate rates for VAT High (21%), VAT Low (9%), and VAT 0%.
Step 2: Setting up articles
Article rules determine to which general ledger number your revenue is posted.
- Menu: Admin → Configuration → Export → Administration → your integration
- Click "Rules" → "Articles" → "New"
Fill in: name, general ledger number, VAT export rule, optionally article group, administration, VAT rates, optionally country/country group, credit/debit/all invoices, ICP/ECP invoices. Click "Apply".
Create separate rules for Dutch sales (21%), Dutch sales (9%), EU sales (reverse charged), and export outside EU (0%).
Step 3: Setting up surcharges
Surcharges are extra costs like transport, packaging, or service charges.
More information about how surcharges work in Easyflor can be found in the guide: Creating and using surcharges
- Menu: Admin → Configuration → Export → Administration → your integration
- Click "Rules" → "Surcharges" → "New"
The steps are almost the same as for articles. The only difference: instead of "Article group" you can choose "Surcharge groups".
Step 4: Setting up containers
Containers are crates, bins, buckets and other packaging materials.
Important choices:
- Single-use: Customer keeps it, must pay (no deposit, normal VAT)
- Multi-use: Customer returns it (always deposit, always VAT 0%)
- Menu: your integration → "Rules" → "Containers" → "New"
- Follow the same steps as articles, paying attention to the deposit and VAT choices.
Step 5: Setting up trolleys
Trolleys are set up the same way as containers.
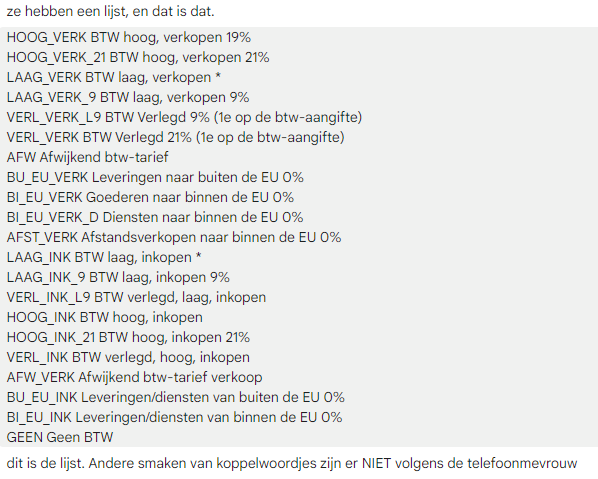
Special explanation for e-Boekhouden
e-Boekhouden does NOT work with general ledger numbers, but with general ledger CODES (names).
Instead of 8020 you use HOOG_VERK_21. Examples: HOOG_VERK_21 (VAT High 21%), LAAG_VERK_9 (VAT Low 9%), GEEN_BTW (No VAT 0%), OMZET_NL (Revenue Netherlands).
Find these codes in your e-Boekhouden environment under general ledger accounts.
Important tips
- Work with your accountant — ask for the correct general ledger numbers
- Test first with one invoice before using it for all invoices
- Start simple — basic VAT rates first, then article rules
- Use clear names — "VAT NL High", "Revenue NL High"
- Document everything — write down which number is for what
- Deposits on containers — multi-use = always deposit = always VAT 0%
- Check regularly — compare revenue monthly between Easyflor and your accounting software
Common mistakes
- Wrong login credentials → check details in your accounting software
- Numbers instead of codes with e-Boekhouden → use codes like "HOOG_VERK_21"
- No VAT rates created → always create VAT rates before articles
- Wrong VAT on deposits → deposit is always VAT 0%
- Starting too complicated → start simple, add more later
- Not testing → always test with one invoice first!
Related guides
- Creating and maintaining VAT rates — Setting up and managing VAT percentages
- Creating and using surcharges — Setting up surcharges for price increases
Summary
To create an accounting integration in Easyflor, go to Admin → System → Configuration → Export → Administration → "New". Fill in the basic information (name, administration, accounting package, data to synchronize, start date, delay). Enter the login credentials for your accounting software. Then fill in accounting numbers via Rules: first create VAT rates, then article rules, surcharges, containers, and trolleys. Important: e-Boekhouden uses codes instead of numbers. Always test with one invoice first and work closely with your accountant.
Do you have questions or need help? Feel free to contact us by phone at +31 (0)71 30 20 310 or send an email to support@easyflor.nl.