- (VIDEO) Creating user and employee
- Adjusting sales unit order
- Creating a user and employee
- Creating an accounting integration
- Creating and maintaining VAT rates
- Creating and using distribution profiles
- Filtering growers or suppliers
- How do I charge no VAT for my customers?
- Importing an Excel sheet / Creating an import template
- Receiving copy emails (mail cc) of order confirmations and/or invoices
- Setting up and executing Flora settlement
- Setting Up and Using AI2
- Setting up currency conversion
- Setting up distribution: Automatically send EKT messages to a KOA debtor
- Setting up payment reminders
- Setting up payment terms
- Setting up Route module
- Setting up SEPA
- Transport and carriers
- VMP article group matching
Importing an Excel sheet / Creating an import template
How do you import products via Excel in Easyflor?
What is an Excel import?
An Excel import is a way to add many products to Easyflor at once without entering them one by one manually. You have an Excel file with all your products and Easyflor reads this file and automatically creates all products.
Why use an Excel import?
- Save time: Add hundreds of products at once instead of one by one
- No typing errors: You don't have to retype everything
- Use existing lists: You already have a product list in Excel and want it in Easyflor
- Quick start: When you're just starting with Easyflor you can quickly add your entire range
- Make updates: You can update prices or descriptions of many products at once
- Efficient: Large assortments are finished much faster
When do you use an Excel import?
Examples:
- You have an Excel list with 500 products from a supplier
- You're starting with Easyflor and want to load your entire range at once
- You receive a new price list in Excel from your auction every week
- You want to update product descriptions for many items at once
- A supplier sends you a product list that you want to adopt
Two ways to import products
Method 1: Via Easyflor support (Easiest!)
- Send your Excel list to support@easyflor.nl
- Ask a consultant to import the list for you
- They ensure everything goes well
- Recommendation: This is the best and safest method!
Method 2: Do it yourself (Advanced)
- You create an import template yourself
- You prepare your Excel file
- You import the file yourself
- Note: This requires some technical knowledge
In this guide we explain Method 2: importing yourself.
Part 1: Creating an import template
What is an import template?
A template is a kind of "translation key" that tells Easyflor which column in your Excel file means what. For example: column A is the product name, column B is the price, etc.
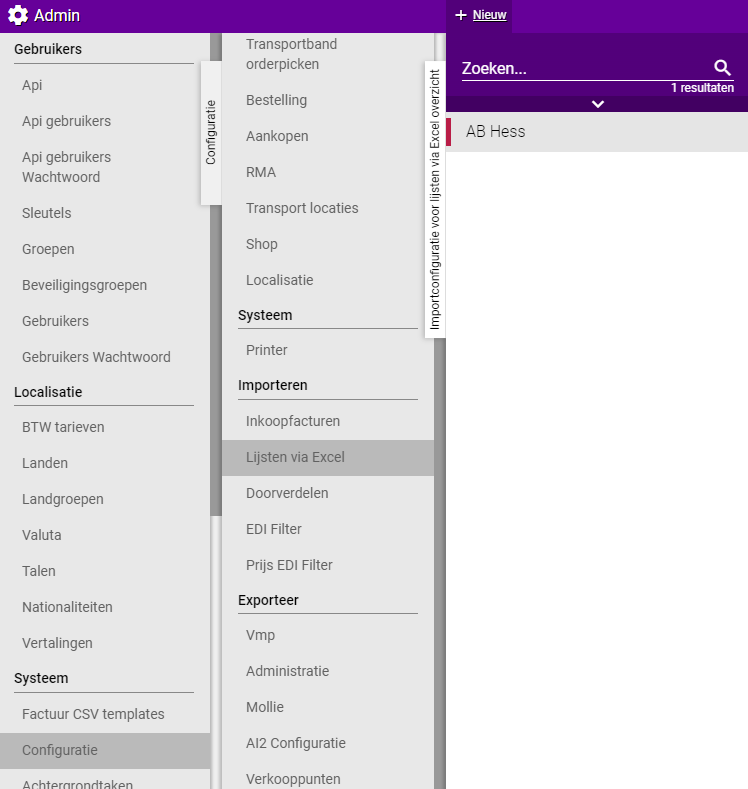
Step 1: Go to import configuration
- Click on the "Admin" tile
- Click on "System"
- Click on "Configuration"
- Click on "Import"
- Click on "Lists via Excel"
Step 2: Create a new template
- Click on "+New"
- Or click on an existing template if you want to modify it
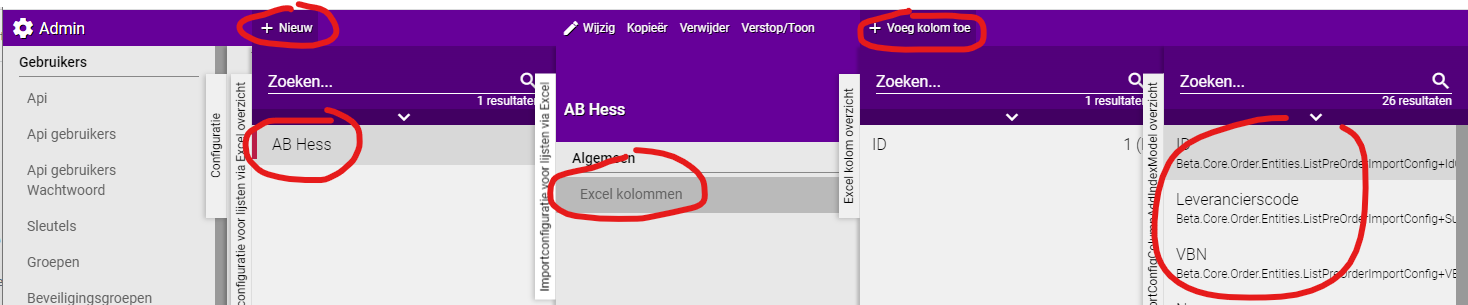
Step 3: Add Excel columns
- Click on the template you just created
- Click on "Excel columns"
- Click on "+Add column"
Important information about required columns
Three columns are ALWAYS required:
Note! These three columns must be in your template, even if they are not (yet) in your Excel file:
- ID: The unique number of the product
- VBN: The VBN code (product code from the flower industry)
- Purchase price: The price at which you purchase the product
What if my Excel doesn't have these columns?
- You must manually add them to your Excel file
- Fill in dummy values where necessary (for example "0" for empty prices)
Part 2: Preparing your Excel file
Step 1: Remove unusable columns
- Are there columns in your Excel that don't fit in Easyflor?
- Remove these columns from your Excel
- Example: columns with internal notes or comments
Step 2: Remove rows above the column names
- All rows above the column labels must go
- Example:
- Remove logos, company name, date, empty rows
- The first row should contain the column names (such as "Product name", "Price", "VBN")
Before:
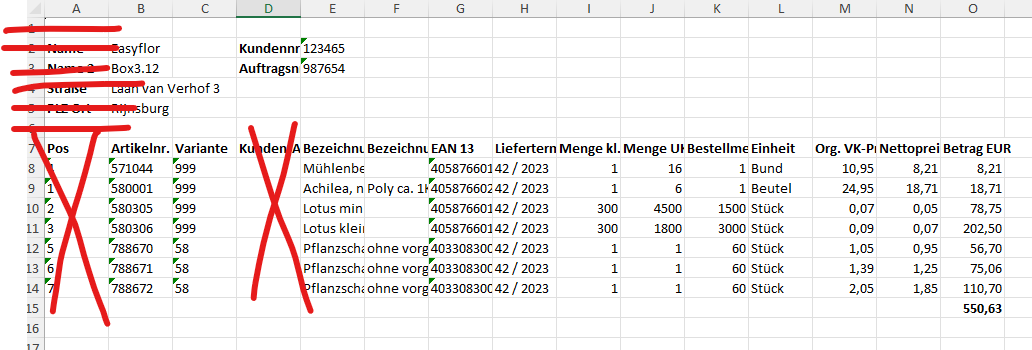
After:

Step 3: Check the format of prices
- Prices must be separated with a comma (not a period)
- Correct: 12,95
- Wrong: 12.95
Step 4: Set all columns to type "Standard"
- All columns must be of type "Standard" in Excel
- This prevents problems when importing
Step 5: Check photo links
- Photo links must start with https://
- Example: https://example.com/photo.jpg
- Not: www.example.com/photo.jpg
Part 3: Configuring the template in Easyflor
Step 1: Link the first column
- Choose the first item from the list in your Excel
- Give it position 0
- This tells Easyflor where the first column is
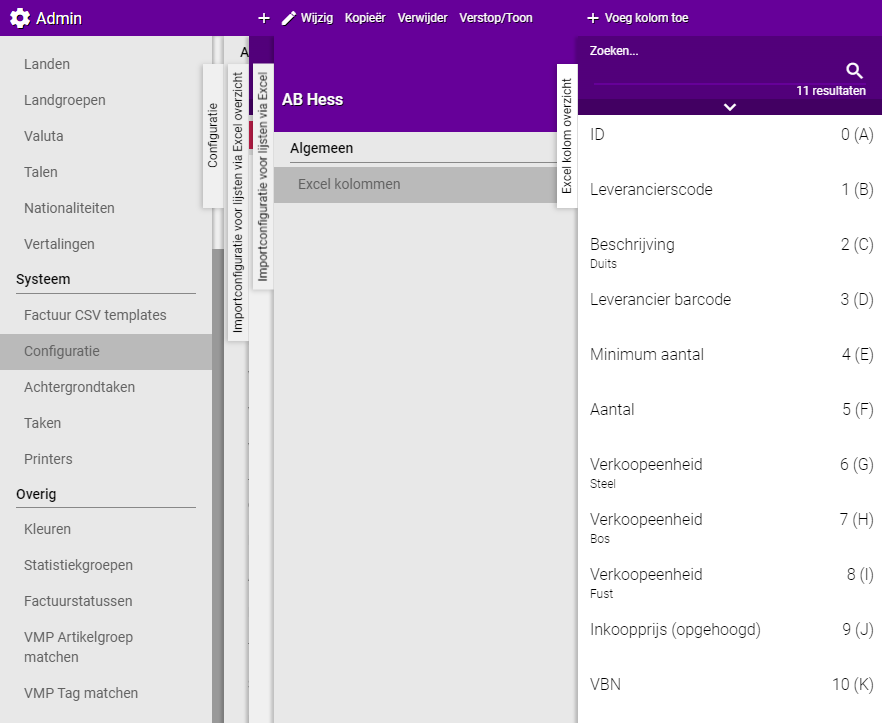
Step 2: Link all columns
For each column in your Excel:
- Select the column (for example "Product name")
- Link it to the correct field in Easyflor
- Give each column the correct position number (0, 1, 2, 3, etc.)
Special option: Description with language
If you select the column "Description":
- You get an extra option to choose a language
- Choose the language in which the description is written
- Example: Dutch, English, German
Special option: Characteristics
For the column "Characteristics":
- You can fill in the exact characteristic code
- This makes clear which characteristic is used for this import
- Example: If you want to indicate that a product is "Organic", you fill in the code for that characteristic
Part 4: Importing the Excel
Step 1: Go to the list where you want to import
- Click on the "Sales" tile
- Click on "Virtual stock"
- Click on "Lists"
- Select the list into which you want to import the products
Step 2: Start the import
- Click on "General"
- Click on "Offer"
- Click on "More..."
- Click on "Via Excel"
- Select your Excel file
- Click on "Import"
Step 3: Wait until the import is complete
- Easyflor is now processing your Excel file
- This may take a while, depending on how many products you import
- You'll see a progress bar or notification
Step 4: Check the result
- Are all products correctly imported?
- Are the prices correct?
- Are the products in the correct list?
Part 5: Adjusting article groups
Why adjust article groups?
During an import, article groups often don't go well. This is because:
- VBN code 2001 are often cut flowers from the auction
- But from the import they are often deco items
- So you need to manually assign the correct article group
You can do this at two moments:
- Before the import: You adjust one item at a time in your Excel
- After the import: You adjust multiple items at once in Easyflor
Option 1: Adjust one item BEFORE the import
When do you use this?
- If you only need to adjust a few items
- If you already know which items are in the wrong group
- For small corrections
How do you do this?
- Open your Excel file
- Find the item that needs to be adjusted
- Adjust the article group in the Excel
- Save the Excel file
- Import the file

Option 2: Adjust multiple items AFTER the import
When do you use this?
- If you want to move many items to another group at once
- If you only see after the import that items are in the wrong group
- For large changes
Step 1: Go to articles
- Click on the "Articles" tile
- Click on "Articles" (under the heading "Articles")
Step 2: Open the control function
- Click on "Control"
Step 3: Choose the move function
- Click on "Move articles to other group"
Step 4: Choose the current group
- Choose the group where the items are now (the wrong group)
- For example: "Cut flowers"
Step 5: Select the items
- Choose in the dropdown menu "Select 1x"
- Click on each product you want to move
- The selected products are marked
Optional: Select all items
- Do you want to move ALL items in this group?
- Double-click instead of clicking on each item
- This automatically selects everything
Step 6: Confirm the selection
- Click again on "Select 1x"
- This confirms which items you want to move
Step 7: Choose the new group
- Select the group where the items should go
- For example: "Deco items"
Step 8: Apply
- Click on "Apply"
- The items are moved to the new group!

Important tips
Tip 1: Let support do it!
- First time importing? Send your Excel to support@easyflor.nl
- They ensure everything goes well
- You learn from their template for next time
Tip 2: Make a backup
- Always make a copy of your Excel file before you start
- If something goes wrong, you still have the original
- Keep it safe!
Tip 3: Test first with a small file
- Try first with 10-20 products
- Everything works well? Then you can import the full list
- This prevents major errors
Tip 4: Check the required columns
- ID, VBN and Purchase price MUST be there
- Forget them? The import fails
- Add them to your Excel if they're missing
Tip 5: Pay attention to formatting
- Prices with comma (12,95)
- All columns type "Standard"
- Photo links with https://
- This prevents import errors
Tip 6: Remove all clutter
- No logos, empty rows or comments above the column names
- The first row should be the column names
- The cleaner your Excel, the better the import
Tip 7: Check article groups immediately
- Check immediately after import whether items are in the correct group
- Often VBN 2001 items are in the wrong group
- Adjust this immediately, then you won't forget later
Tip 8: Use clear column names
- Use clear names in your Excel like "Product name", "Price", "VBN"
- Not: "Column1", "Data", "X"
- This makes linking in the template much easier
Common mistakes
Mistake 1: Forgetting required columns
- Your Excel doesn't have an ID, VBN or Purchase price column
- Result: The import fails
- Solution: Add these columns to your Excel (fill in dummy values where necessary)
Mistake 2: Not removing rows above column names
- Your Excel has logos, date, or empty rows above the column names
- Result: Easyflor reads the wrong row as column names
- Solution: Remove everything above the row with column names
Mistake 3: Prices with period instead of comma
- You use 12.95 instead of 12,95
- Result: Prices are read incorrectly
- Solution: Replace all periods with commas in price columns
Mistake 4: Wrong column type in Excel
- Columns are not of type "Standard"
- Result: Data is read incorrectly
- Solution: Set all columns to type "Standard" in Excel
Mistake 5: Photo links without https://
- You use www.example.com/photo.jpg
- Result: Photos are not loaded
- Solution: Make sure all photo links start with https://
Mistake 6: Column position incorrectly assigned
- You give column 3 position 1 in the template
- Result: Data ends up in the wrong fields
- Solution: Assign columns correctly: first column = position 0, second = position 1, etc.
Mistake 7: Article groups not checked
- You import and don't check the article groups
- Result: Products are in wrong categories
- Solution: Check immediately after import and adjust where needed
Mistake 8: Too large file at once
- You import 5000 products at once without testing
- Result: If there's an error, everything has to be redone
- Solution: Test first with a small file (10-20 products)
Mistake 9: Gaps in the columns
- Your Excel jumps from column C to column E, leaving column D empty
- Result: The column positions no longer match and data is read incorrectly or not imported at all
- Solution: Make sure all columns are adjacent with no empty columns in between. Remove empty columns or move your data so there are no gaps
Visual overview of the process
STEP 1: Prepare
    ↓
Clean and check Excel file
Remove clutter, check formatting, add required columns
    ↓
STEP 2: Create template
    ↓
Admin → Configuration → Lists via Excel → New
Link columns to Easyflor fields
    ↓
STEP 3: Import
    ↓
Sales → Lists → [Choose list] → Offer → More → Via Excel
Select file → Import
    ↓
STEP 4: Check
    ↓
Are all products correctly imported?
Are the prices and descriptions correct?
    ↓
STEP 5: Adjust article groups (if needed)
    ↓
Articles → Control → Move to other group
Select articles → Choose new group → Apply
    ↓
DONE! Products are in Easyflor
Summary
To import products via Excel in Easyflor, you can choose two routes: the easiest way is to send your Excel list to support@easyflor.nl and ask a consultant to import it for you, or you do it yourself by creating an import template and preparing your Excel file.
For importing yourself, you first create a template by going to Admin, then to System, Configuration, Import and Lists via Excel where you click "+New". In this template you link the columns from your Excel to the correct fields in Easyflor by going to "Excel columns" and clicking "+Add column". There are three columns that are always required:
- ID: the unique number of the product
- VBN: the VBN code
- Purchase price: the price at which you purchase the product
If your Excel doesn't have these columns, you must add them manually. Additionally, you need to properly prepare your Excel file:
- Remove all columns that don't fit in Easyflor
- Remove all rows above the column names (such as logos, date, empty rows)
- Make sure prices are separated with a comma (12,95 instead of 12.95)
- Set all columns to the type "Standard"
- Photo links must start with https://
After preparing your Excel and configuring the template in Easyflor, you import the file via Sales, then Virtual stock, Lists, select the list, go to General, Offer, click on "More...", then on "Via Excel", select your file and click on "Import".
After the import, it's important to check the article groups because these often don't go well. VBN code 2001 are for example often cut flowers from the auction but are often seen as deco items during import. You can adjust article groups in two ways:
- Before the import: adjust one item at a time in your Excel file
- After the import: move multiple items at once in Easyflor by going to Articles, then to Articles, click on Control, select "Move articles to other group", choose the current group, click on "Select 1x", select the items (or double-click to select all), click again on "Select 1x", choose the new group and click on "Apply"
It's always wise to test with a small file first (10-20 products) before importing your full list, and make a backup of your Excel file before you start.
Do you have questions or need help? Feel free to contact us by phone at +31 (0)71 30 20 310 or send an email to support@easyflor.nl.