- (VIDEO) Creating user and employee
- Adjusting sales unit order
- Creating a user and employee
- Creating an accounting integration
- Creating and maintaining VAT rates
- Creating and using distribution profiles
- Filtering growers or suppliers
- How do I charge no VAT for my customers?
- Importing an Excel sheet / Creating an import template
- Receiving copy emails (mail cc) of order confirmations and/or invoices
- Setting up and executing Flora settlement
- Setting Up and Using AI2
- Setting up currency conversion
- Setting up distribution: Automatically send EKT messages to a KOA debtor
- Setting up payment reminders
- Setting up payment terms
- Setting up Route module
- Setting up SEPA
- Transport and carriers
- VMP article group matching
Setting up SEPA
How do you set up SEPA direct debit for automatic payments in Easyflor?
What is SEPA direct debit?
SEPA direct debit is an automatic way to collect money from your customers. Instead of customers transferring themselves, you automatically debit the money from their account (with their permission of course). SEPA stands for Single Euro Payments Area and works throughout Europe.
Why use SEPA direct debit?
- Get paid automatically: You don't have to wait for customers to pay
- Less hassle: No more manual transfers
- Money faster: You decide when to collect
- Fewer bad payers: Customers can't "forget" to pay
- Professional: Large companies also work this way
- Time savings: No more sending reminders
- Better cash flow: You know exactly when money is coming in
When do you use SEPA direct debit?
Examples:
- You have regular customers who order every week
- You want to automatically collect invoices after 14 days
- Customers themselves ask for automatic direct debit
- You want to improve your cash flow
- You have many small payments that need to be automatic
Note: Customers must first sign a mandate before you can collect!
Two types of SEPA direct debit
SEPA CORE:
- For individuals (regular people)
- For small businesses
- Customer has 8 weeks to protest (request money back)
SEPA B2B:
- Only for businesses
- Stricter: customer cannot protest (except for fraud)
- Only possible if both parties are business entities
In this guide we set up both, so you can use either!
Overview: What are you going to do?
You will set up SEPA in three steps:
Step 1: SEPA configuration in the system (for all of Easyflor) Step 2: Fill in your own company's SEPA details (per administration) Step 3: Fill in customers' SEPA details (per debtor)
Part 1: SEPA configuration in the system
Step A: Creating number categories
What are number categories?
These are "boxes" in which you can later fill in different types of numbers and data. You create them once and then use them everywhere.
Step 1: Go to number categories
- Click on the "Admin" tile
- Click on "Organization"
- Click on "Number Categories"
- Click on "+New"
Step 2: Create the following 6 categories
For each category do the following:
- Click on "+New"
- Fill in the "Code" with the name
- Fill in "Number category" with exactly the same name
- Click on "Save"
Create these 6 categories:
1. IBAN Name
- Code: IBAN Name
- Number category: IBAN Name
2. IBAN Number
- Code: IBAN Number
- Number category: IBAN Number
3. BIC code
- Code: BIC code
- Number category: BIC code
4. SEPA ID
- Code: SEPA ID
- Number category: SEPA ID
5. SEPA name
- Code: SEPA name
- Number category: SEPA name
6. SEPA Date signed (YYYY-MM-DD)
- Code: SEPA Date signed (YYYY-MM-DD)
- Number category: SEPA Date signed (YYYY-MM-DD)
What do these categories mean?
- IBAN Name: The name of the account holder
- IBAN Number: The account number (for example NL12ABCD0123456789)
- BIC code: The bank code (for example ABNANL2A)
- SEPA ID: Your unique SEPA creditor ID
- SEPA name: The name that appears on the direct debit
- SEPA Date signed: When the customer signed the mandate
Step B: Creating payment methods
What are payment methods?
These are the ways customers can pay. You create two: one for individuals (CORE) and one for businesses (B2B).
Step 1: Go to payment methods
- Click on the "Admin" tile
- Click on "Organization"
- Click on "Payment methods"
- Click on "+New"
Step 2: Create the first payment method
SEPA CORE (for individuals):
- Click on "+New"
- Name: "SEPA CORE"
- Type: "Bank"
- Click on "Save"
Step 3: Create the second payment method
SEPA B2B (for businesses):
- Click again on "+New"
- Name: "SEPA B2B"
- Type: "Bank"
- Click on "Save"
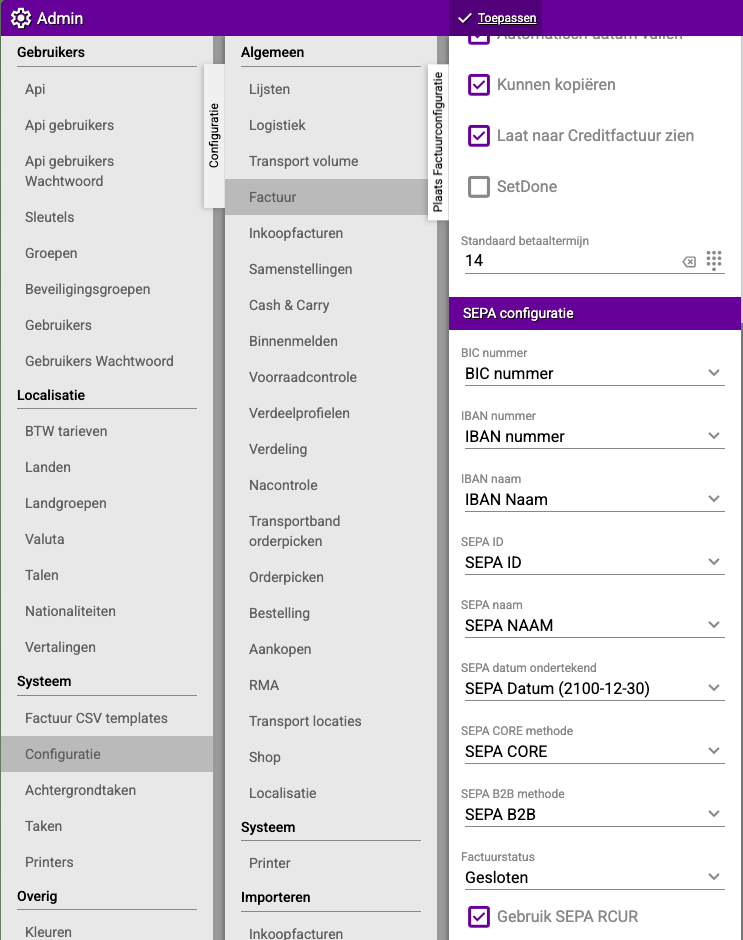
Step C: Linking SEPA configuration
Now you're going to link everything together!
Step 1: Go to SEPA configuration
- Click on the "Admin" tile
- Click on "System"
- Click on "Configuration"
- Click on "General"
- Click on "Invoice"
- Click on "SEPA configuration"
Step 2: Select the categories and payment methods
You now see various fields. Link them as follows:
IBAN:
- Select the category "IBAN Number"
BIC:
- Select the category "BIC code"
SEPA name:
- Select the category "SEPA name"
SEPA ID:
- Select the category "SEPA ID"
SEPA CORE payment method:
- Select "SEPA CORE"
SEPA B2B payment method:
- Select "SEPA B2B"
Step 3: Set the invoice status
Invoice status:
- Set this to "Paid"
- This means: when the money is received, the invoice is automatically set to "paid"
What does this do?
- As soon as the money is in your account with the invoice number as reference
- Easyflor automatically sets the invoice to "paid"
- You don't have to manually track what's been paid!
Step 4: Check "Use SEPA RCUR"
Important! Check this box:
- "Use SEPA RCUR"
What does this do?
- RCUR stands for "Recurrent"
- This allows you to collect more than once from the same customer
- Without this checkbox you can only collect once per customer!
Step 5: Save everything
- Click "Apply" at the top
- All settings are saved
Part 2: Filling in your own SEPA details (Administration)
Why this part?
Now you need to fill in your own company's details: your IBAN, BIC, SEPA ID, etc. This way Easyflor knows which account to collect from.
Step 1: Go to your administration
- Click on "Organization"
- Click on "General"
- Click on "Administrations"
- Select your administration (for example "De Roos Flower Shop")
Step 2: Go to numbers
- Click on "General"
- Click on "Numbers"
Step 3: Add your details
For each of the following details do this:
- Click on "+New"
- Select the Number Category
- Fill in the data
- Click on "Save"
Add these 4 details:
1. BIC number
- Number Category: "BIC code"
- Data: Your BIC code (for example: ABNANL2A)
- Where do you find this? On your bank statements or ask your bank
2. IBAN Name
- Number Category: "IBAN Name"
- Data: Your company name (for example: De Roos Flower Shop)
3. IBAN Number
- Number Category: "IBAN Number"
- Data: Your IBAN number (for example: NL12ABCD0123456789)
- Where do you find this? On your bank statements
4. SEPA ID
- Number Category: "SEPA ID"
- Data: Your SEPA Creditor ID (for example: NL12ZZZ123456789)
- Where do you find this? Request this from your bank when you want to use SEPA
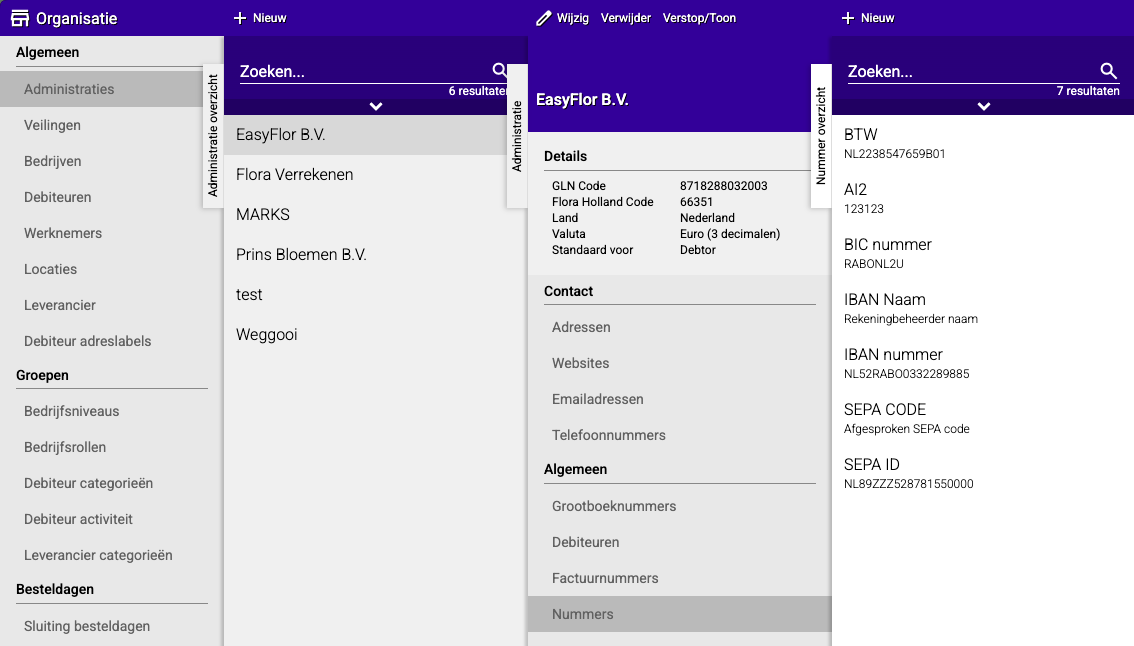
Important: These details are from YOUR company, not from your customers!
Part 3: Filling in customers' SEPA details (Debtor)
Why this part?
Now you fill in the details for each customer needed to collect from them: their IBAN, the mandate date, etc.
You do this for every customer who wants to pay via SEPA!
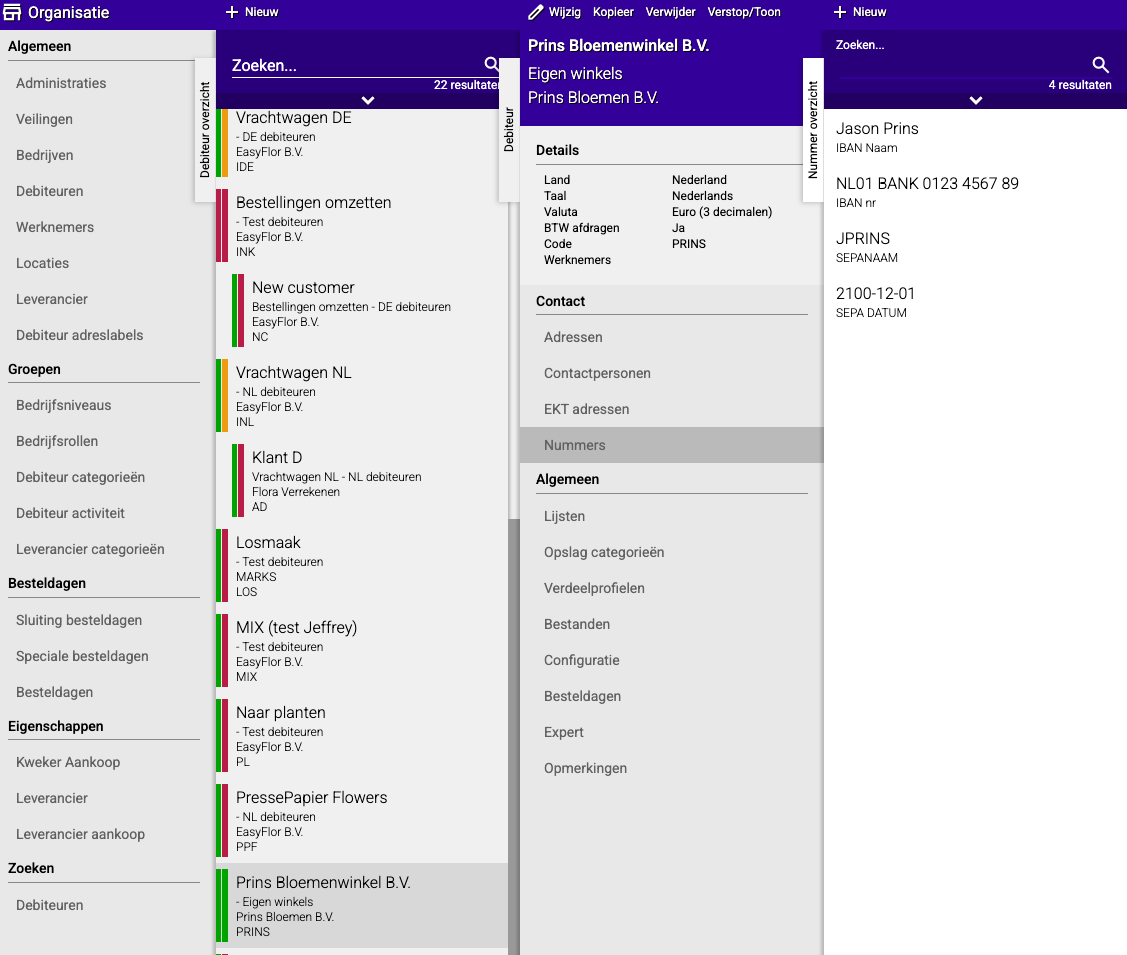
Step A: Setting the payment method for the customer
Step 1: Go to the debtor
- Click on "Organization"
- Click on "General"
- Click on "Debtors"
- Select the customer (debtor) who will pay via SEPA
Step 2: Set the payment method
- Click on "General"
- Click on "Configuration"
- Click on "General"
- Click on "Invoice"
Step 3: Choose the correct SEPA method
At the top you see the field "Payment method". Choose:
- "SEPA CORE" if the customer is an individual or small business
- "SEPA B2B" if the customer is a business customer
Step 4: Save
- Click on "Save"
Step B: Filling in the customer's SEPA details
Step 1: Go to numbers
- You're still at the same debtor
- Click on "Contact"
- Click on "Numbers"
- Click on "+New"
Step 2: Add the customer details
For each of the following details do this:
- Click on "+New"
- Select the Number Category
- Fill in the customer's data
- Click on "Save"
Add these 4 details:
1. IBAN Name
- Number Category: "IBAN Name"
- Data: The name of the account holder (for example: John Smith)
- Where do you get this? From the customer, on the mandate
2. IBAN Number
- Number Category: "IBAN Number"
- Data: The customer's IBAN number (for example: NL98BANK0987654321)
- Where do you get this? From the customer, on the mandate
3. SEPA Name
- Number Category: "SEPA name"
- Data: The name to appear on the direct debit (usually the same as IBAN Name)
4. SEPA Date signed
- Number Category: "SEPA Date signed (YYYY-MM-DD)"
- Data: The date the customer signed the mandate
- Format: YYYY-MM-DD (for example: 2024-01-15 for January 15, 2024)
- Where do you get this? From the completed and signed mandate
Step 3: Repeat for each customer
- Do Step A and Step B for each customer who wants to pay via SEPA
- Each customer needs their own details!
Important tips
Tip 1: Start with the mandate
- A customer must FIRST sign a SEPA mandate
- Only then may you collect
- Collecting without a mandate is illegal!
- Keep the mandate safe (digitally and on paper)
Tip 2: Ask your bank for a SEPA ID
- You need a special SEPA Creditor ID
- You request this from your bank
- Sometimes this costs money or you need to sign a contract
- Arrange this before you start setting up
Tip 3: Double-check all details
- One wrong digit in an IBAN and the collection fails
- Always double-check IBANs
- Test first with one customer before setting it up for everyone
Tip 4: Pay attention to date notation
- SEPA Date must be in format YYYY-MM-DD
- Correct: 2024-01-15
- Wrong: 15-01-2024 or 15/01/2024
- This is important for administration
Tip 5: Use "SEPA RCUR"
- Don't forget to check "Use SEPA RCUR"
- Otherwise you can only collect once per customer
- This is essential for recurring customers!
Tip 6: Test first
- Test the collection first with one customer
- Collect a small amount (for example €1.00)
- Does it work? Then you can continue with other customers
Tip 7: Communicate with customers
- Tell customers when you're going to collect
- Send an invoice before the collection
- This prevents surprises and complaints
Common mistakes
Mistake 1: Number categories not created
- You try to fill in data, but the categories don't exist
- Result: You can't select data
- Solution: First create all 6 number categories in Part 1, Step A
Mistake 2: "Code" and "Number category" different
- You fill in "IBAN" for Code and "IBAN Number" for Number category
- Result: Confusion and it may not work properly
- Solution: Always make them exactly the same
Mistake 3: Wrong IBAN entered
- You make a typo in the IBAN number
- Result: Collection fails, customer is not debited
- Solution: Always double-check IBANs, ask customer for confirmation
Mistake 4: "Use SEPA RCUR" not checked
- You forget to check this box
- Result: You can only collect once per customer
- Solution: Always check this in Part 1, Step C!
Mistake 5: No SEPA ID requested
- You try to collect without a SEPA Creditor ID
- Result: Collection is rejected by the bank
- Solution: First request a SEPA ID from your bank
Mistake 6: Mandate not kept
- You collect but don't have a signed mandate
- Result: In case of protest you can't prove you had permission
- Solution: Keep all mandates carefully
Mistake 7: Wrong date format
- You enter 15-01-2024 instead of 2024-01-15
- Result: The system doesn't accept it or gives an error
- Solution: Always use YYYY-MM-DD
Mistake 8: SEPA CORE and B2B mixed up
- You use SEPA B2B for an individual
- Result: Collection is rejected
- Solution: Individuals = CORE, Businesses = B2B
What do you need before you start?
From your own bank:
- A SEPA Creditor ID (request this)
- Your IBAN number
- Your BIC code
- A SEPA direct debit contract (often required)
From each customer:
- A signed SEPA mandate
- The customer's IBAN number
- The name of the account holder
- The date the mandate was signed
Make sure you have all of this before you start setting up!
Visual overview of the process
PART 1: System setup
    ↓
Step A: Create 6 Number categories
Step B: Create 2 Payment methods (CORE and B2B)
Step C: Link everything in SEPA configuration + check RCUR
    ↓
PART 2: Fill in your company details
    ↓
Administration → Numbers → Add 4 details
(BIC, IBAN Name, IBAN Number, SEPA ID of your company)
    ↓
PART 3: Set up per customer
    ↓
Step A: Choose payment method (CORE or B2B)
Step B: Fill in 4 customer details
(IBAN Name, IBAN Number, SEPA Name, Date signed)
    ↓
Repeat Part 3 for each customer
    ↓
DONE! You can now collect automatically
Summary
To set up SEPA direct debit in Easyflor, you go through three main parts: first the system configuration, then your own company details and finally the details of each customer.
In Part 1: SEPA configuration you first create six number categories via Admin, Organization and Number Categories by clicking "+New". The categories you create are:
- IBAN Name
- IBAN Number
- BIC code
- SEPA ID
- SEPA name
- SEPA Date signed (YYYY-MM-DD)
For each category you fill in exactly the same name for both "Code" and "Number category". Then you create two payment methods via Admin, Organization and Payment methods: SEPA CORE (for individuals and small businesses) and SEPA B2B (only for business customers), both with type "Bank". Then you go to Admin, System, Configuration, General, Invoice and SEPA configuration to link everything together by selecting the correct categories for IBAN, BIC, SEPA name and SEPA ID, and linking the payment methods. Very important is that you set the invoice status to "Paid" (so invoices are automatically set to paid when the money arrives) and that you check the box "Use SEPA RCUR" (otherwise you can only collect once per customer).
In Part 2: Administration configuration you fill in your own company's details by going to Organization, General, Administrations, selecting your administration and clicking on General, Numbers. There you add four details by clicking "+New" each time:
- BIC number (your bank code)
- IBAN Name (your company name)
- IBAN Number (your own IBAN)
- SEPA ID (your SEPA Creditor ID from the bank)
In Part 3: Debtor configuration you set up the SEPA details per customer. This consists of two steps: first you set the payment method by going to Organization, General, Debtors, selecting the customer, going to General, Configuration, General, Invoice and choosing the correct payment method at the top (SEPA CORE for individuals or SEPA B2B for businesses). Then you fill in the customer details by going to Contact, Numbers and adding four details:
- IBAN Name (name of the account holder)
- IBAN Number (customer's IBAN)
- SEPA Name (name for the direct debit)
- SEPA Date signed (mandate date in format YYYY-MM-DD, for example 2024-01-15)
You repeat this last part for each customer who wants to pay via SEPA. Important to know is that customers must first sign a SEPA mandate before you may collect, and that you need a SEPA Creditor ID from your bank before you can start.
Do you have questions or need help? Feel free to contact us by phone at +31 (0)71 30 20 310 or send an email to support@easyflor.nl.